Trigger an Action from an Event Notification
- Print
- DarkLight
Trigger an Action from an Event Notification
- Print
- DarkLight
Article summary
Did you find this summary helpful?
Thank you for your feedback
The Webhook.site is convenient because you can use it to receive and display HTTP messages without creating an account, but it is somewhat limited. This tutorial uses Pipedream, a workflow automation platform that is similar to IFTTT and Zapier, to deploy the webhook endpoint, run JavaScript code to validate the message signature, and append a row to a Google Sheet for each event in the Event Notification message.
After you create a Pipedream account, you can use the code from this tutorial, and the Python code in the AWS Lambda tutorial, as the basis to validate Backblaze B2 Event Notification message signatures in your integrations.
Note
To enable this feature, contact the Support team to request access.
Currently, Group admins cannot manage Event Notification rules in a Group member’s account.
Currently, Group admins cannot manage Event Notification rules in a Group member’s account.
Retrieve the Event Notification Rule Signing Secret
You can retrieve the signing secret that Backblaze B2 created when you saved the rule.
Since you can trigger an action from each Event Notification message, you should ensure that those messages really do come from Backblaze B2 and that they have not been tampered with in transit. Each message contains a signature that is sent in the x-bz-event-notification-signature HTTP header. The signature is a hex-encoded hash-based message authentication code (HMAC) that is computed from the message payload and a signing secret that Backblaze B2 generates when you create a rule. You can retrieve the signing secret using either the b2_get_bucket_notification_rules API or the Backblaze web console. This tutorial uses the Backblaze web console.
- Sign in to your Backblaze account.
- In the left navigation menu under B2 Cloud Storage, click Buckets.
- Click the Event Notifications link for your bucket.
- In the Event Notifications dialog next to Secret, click
 (copy).
 - Save the secret value for use in a later step.
Validate the Event Notification Message Signature
You can validate a message signature to verify that the message was sent by Backblaze B2, and it was not tampered with in transit.
Before you begin: Create a Pipedream account using either a Google or GitHub account or email and password.
- Sign in to your Pipedream account.
- Create a project.
- Click Create Project.
- Enter a name for your project.
- Click Create Project.
- Create a workflow.
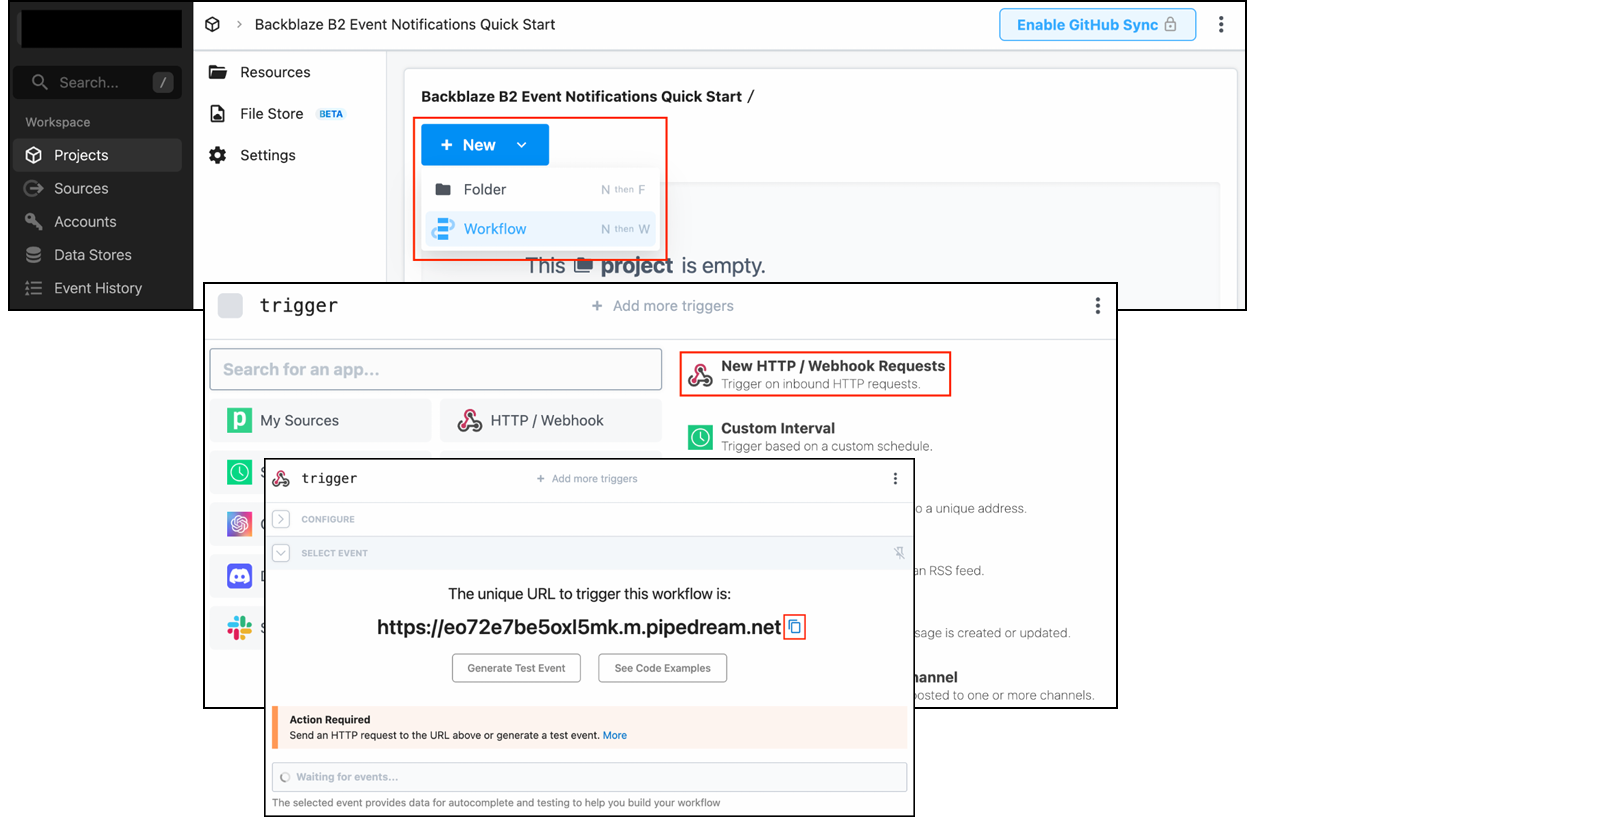
- In your newly created project, click New.
- Select Workflow.
- Enter a name for your workflow.
Leave all other fields as their default values. - Click Create Workflow.
- Select a trigger to fire the workflow to build a webhook endpoint that receives HTTP POST requests.
- Click Add Trigger.
- Click New HTTP / Webhook Requests.
- In the Event Data menu, select Raw Request to enable your workflow to access the raw request payload to validate the message signature.
- In the HTTP Response menu, select Return a custom response from your workflow.
Leave all other fields as their default values. - Click Save and continue.
- In the Select Event tab, click
 (copy) next to your unique URL.
Leave the Pipedream browser tab open.
Add a Target URL
- In a new tab, sign in to your Backblaze account.
- In the left navigation menu under B2 Cloud Storage, click Buckets.
- Click the Event Notifications link for your bucket.
- In the Event Notifications dialog, click
 (kebab icon) and click Edit.
You can include each event type in only one event notification rule, so you cannot keep the existing object creation rule and add a new one for the same event types. - Paste the Pipedream URL into the Target URL field, and click Test Rule.
- Click Save Rule.
An Event Notification is sent to Pipedream.
View the Event Notification
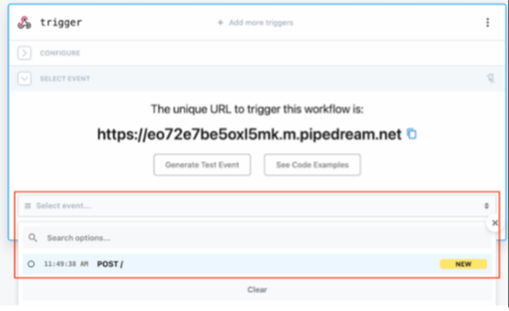

- In Pipedream, select the new POST event in the Select Event menu.
The Event Notification message payload is displayed. - Open the
headerselement to inspect it. Theheaderselement is an array of strings with header names that alternate with their values includingX-Bz-Event-Notification-Signature. - Click Continue.
Add JavaScript to Validate the Message Signature
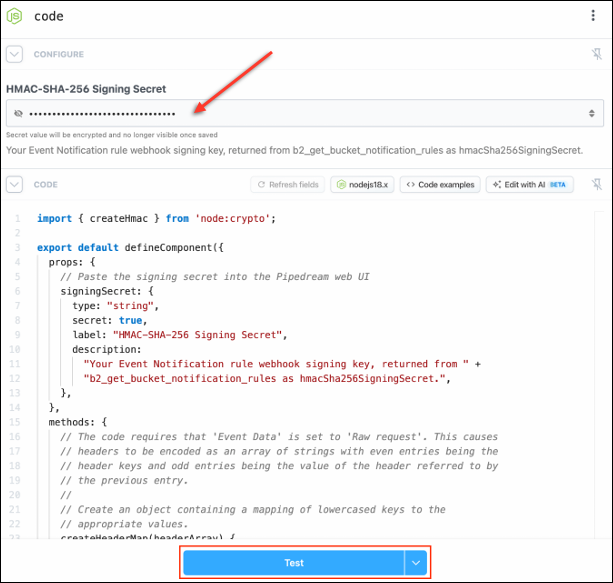
- In Pipedream, click Run custom code.
- Select all of the code in the new step, delete it, and paste in the following JavaScript:You can use this code as the basis for your own integrations. The
Click here for JavaScript code.
import { createHmac } from 'node:crypto'; export default defineComponent({ props: { // Paste the signing secret into the Pipedream web UI signingSecret: { type: "string", secret: true, label: "HMAC-SHA-256 Signing Secret", description: "Your event notification rule webhook signing key, available in the " + "Web UI and returned from b2_get_bucket_notification_rules as " + "hmacSha256SigningSecret.", }, data: { type: "data_store" }, }, methods: { // The code requires that 'Event Data' is set to 'Raw request'. This causes // headers to be encoded as an array of strings with even entries being the // header keys and odd entries being the value of the header referred to by // the previous entry. // // Create an object containing a mapping of lowercased keys to the // appropriate values. createHeaderMap(headerArray) { const headerMap = {}; for (let i = 0; i < headerArray.length; i+=2) { headerMap[headerArray[i].toLowerCase()] = headerArray[i+1]; } return headerMap; }, // Helper method to log an error, send the HTTP response, and exit the flow async handleError(status, message, detail, $) { console.error(`${message}: ${detail}`); await $.respond({status: status, body: message}); return $.flow.exit(message); }, }, // This is the entry point for the step // See https://pipedream.com/docs/code/nodejs/#adding-a-code-step async run({steps, $}) { const event = steps.trigger.event; // event.headers is an array with alternating header names and values // It's much easier to work with as a map! const headers = this.createHeaderMap(event.headers); if ('x-bz-event-notification-signature' in headers) { // Verify that signature has form "v1=2c8...231" const signature = headers['x-bz-event-notification-signature']; const pair = signature.split('='); if (!pair || pair.length !== 2) { return this.handleError(401, 'Invalid signature format', signature, $); } const version = pair[0]; if (version !== 'v1') { return this.handleError(401, 'Invalid signature version', version, $); } // Now calculate the HMAC and compare it with the one sent in the header const receivedSig = pair[1]; const calculatedSig = createHmac('sha256', this.signingSecret) .update(event.body) .digest('hex'); if (receivedSig !== calculatedSig) { return this.handleError(401, 'Invalid signature', `Received ${receivedSig}; calculated ${calculatedSig}`, $ ); } } else { return this.handleError(401, 'Missing signature header', '', $); } // Success! console.log('Signature is valid'); // Parse the raw message body so later steps can access the fields try { const body = JSON.parse(event.body); await $.respond({ immediate: true, status: 200, body: 'OK' }); // Google Sheets add_multiple_rows wants an array of arrays const events = [] for (const e of body.events) { // Did we already process this event? if (!await this.data.has(e['eventId'])) { // Add the eventId to the data store for deduplication await this.data.set(e['eventId'], new Date()); events.push([ e['eventTimestamp'], e['eventType'], e['objectName'], e['objectSize'], e['objectVersionId'], ]); } } console.log(`Incoming events: ${body.events.length}`) console.log(`Outgoing events: ${events.length}`) // Return the event for use by later steps return events; } catch (e) { return this.handleError(400, 'Invalid JSON in message payload', e, $); } }, })HMAC-SHA256calculation is very straightforward. - Click Refresh fields so that Pipedream parses the code and displays fields to enter the signing secret and configure a data store.
- Paste the secret value that you saved earlier in the HMAC-SHA-256 Signing Secret field.
- Under Data, click Create a Store.
- Enter a name for your store, and click Save.
The JavaScript code uses the data store for deduplication. If you use a free Pipedream account, the data store is limited to 50 keys. If you receive a notification from Pipedream that you reached your plan's data store limits, see Data Stores in Pipedream, click the data store name, and delete the entries.
- Click Test to run the Node.js code on the test message that Pipedream received earlier.
The workflow returns a success notification. Select the Exports tab, and click into the message to view the test message payload. - Click Deploy.
Send the Notification
- In your Backblaze tab, upload another file to your bucket.
A notification message is sent to the workflow. - In your Pipedream tab, click the new event to see details.
- Open the body element to see the Event Notification message payload.
The code step is displayed that indicates the workflow was successfully run. A response was generated with a body of “OK” and a status of 200. The signature was valid, so the code verified that the message was signed by Backblaze B2 and was not tampered with in transit.

Perform an Action in Response to an Event Notification
Pipedream can tell the workflow to perform an action that is triggered by each event. This tutorial uses Pipedream to add a row to a spreadsheet in Google Sheets.
- Sign in to Google, and go to https://sheet.new/.
- Enter a meaningful name in the spreadsheet so that it is easy to select in another step.
- Paste the following headers in the first row of the sheet:
- Event Timestamp
- Event Type
- Object Name
- Object Size
- Object Version ID
- In Pipedream, click Edit in the upper-right corner of the page to return to the workflow builder.
- Click
 (add) under the "code" step.
 - Click Google Sheets.
If you do not see Google Sheets listed among the apps, enter Google Sheets into the ‘Search for an app…’ field. - Click Add Multiple Rows.
A single Event Notification message contains one or more events. - Connect your Google Sheets account to Pipedream.
- Click Connect a Google Sheets account, select your Google account, and give Pipedream permission to access your Google Drive files.
- Select the spreadsheet you just created.
- Select the sheet name.
- Set Row Values to
{{steps.code.$return_value}}. - Click Test.
A row is added to the spreadsheet. Google Sheets does not always automatically update as the row is added. You may need to refresh the page.
- Click Deploy to save the new action.
If you upload more files to your Backblaze B2 bucket, more rows are added to the Google Sheets. You may need to refresh the page to see the new rows.
You can experiment more with Pipedream. You might want to run custom code in a new step, send a Slack message for each event, or even send SMS messages using Twilio.
Was this article helpful?