Veritas Backup Exec Integration with Backblaze B2
- Print
- DarkLight
Veritas Backup Exec Integration with Backblaze B2
- Print
- DarkLight
Article summary
Did you find this summary helpful?
Thank you for your feedback
Veritas Backup Exec focuses on keeping data protection simple, secure, and unified. You choose what to back up, where to store it, and how to pay for it. Your data remains secure and available at every stage—whether backing up on-premises data to Backblaze B2 Cloud Storage, protecting workloads within the cloud, recovering from the cloud, or just connecting to on-site storage.
This guide assumes that you already have a working Veritas Backup Exec environment with hosts and backups, and that your Veritas Backup Exec software is upgraded to a minimum of version 22.
Warning
Veritas does not support the Backblaze US-East region and endpoint. If you created an account using the Backblaze US-East region, you should delete the account and create a new account selecting either the US-West region or the EU-Central region.
The following video guide walks you through how to set up Backblaze B2 as a Veritas Backup Exec cloud storage target.
Enable Backblaze B2
Before you begin: You must have a Backblaze B2 Cloud Storage account. If you already have a Backblaze account and the left navigation menu contains a B2 Cloud Storage section, your account is already enabled for Backblaze B2.
- Sign in to the Backblaze web console.
- In the user menu in the upper-right corner of the page, select My Settings.
- Under Enabled Products, select the checkbox to enable B2 Cloud Storage.
- Review the Terms and Conditions, and click OK to accept them.
Create a Bucket
- Sign in to the Backblaze web console.
- In the left navigation menu under B2 Cloud Storage, click Buckets.
- Click Create a Bucket.
- Enter a name for your bucket. Bucket names must be at least six characters and globally unique.
A message is displayed if your bucket name is already in use. - Select a privacy setting: Private or Public.NoteYou can change a bucket's privacy settings at any time.
Files that are in a private bucket require authentication to perform an action, for example, downloading.
Public buckets do not require authentication so you can easily access files. If this is your first time creating a public bucket, complete the following tasks to ensure that you have the correct permissions to create a public bucket:
1. Verify your email address.
2. Have a payment history on file, or use the credit card form to pay a small fee that is credited to your account balance. - If applicable, enable a Backblaze B2 server-side encryption key.
- Enable Object Lock to restrict a file from being modified or deleted for a specified period of time.
- Click Create a Bucket, and copy the value that is in the Endpoint field; you may need this value later.
- Click Lifecycle Settings to control how long to keep the files in your new bucket.
Create an Application Key
Sign in to the Backblaze web console.
In the left navigation menu under B2 Cloud Storage, click Application Keys.
Click Add a New Application Key, and enter an app key name.
You cannot search an app key by this name; therefore, app key names are not required to be globally unique. Key names are limited to 100 characters and can contain letters, numbers, and "-", but not I18N characters, such as é, à, and ü.Select All or select a specific bucket in the Allow Access to Bucket(s) menu.
If you select a specific bucket, you can also select Allow List All Bucket Names.
This option is required for the B2 Native API b2_list_buckets and the S3-Compatible API S3 List Buckets operations.
(Optional) Select your access type (Read and Write, Read Only, or Write Only).
(Optional) Enter a file name prefix to restrict application key access only to files with that prefix.
Depending on what you selected in step #4, this limits application key access to files with the specified prefix for all buckets or just the selected bucket.(Optional) Enter a positive integer to limit the time, in seconds, before the application key expires.
The value must be less than 1000 days (in seconds).Click Create New Key, and note the resulting keyID and applicationKey values.
Note
When you create a new app key, the response contains the actual key string, for example N2Zug0evLcHDlh_L0Z0AJhiGGdY. You can always find the keyID on this page, but for security, the applicationKey appears only once. Make sure you copy and securely save this value elsewhere.
Configure Cloud Storage using the Veritas Backup Exec Console
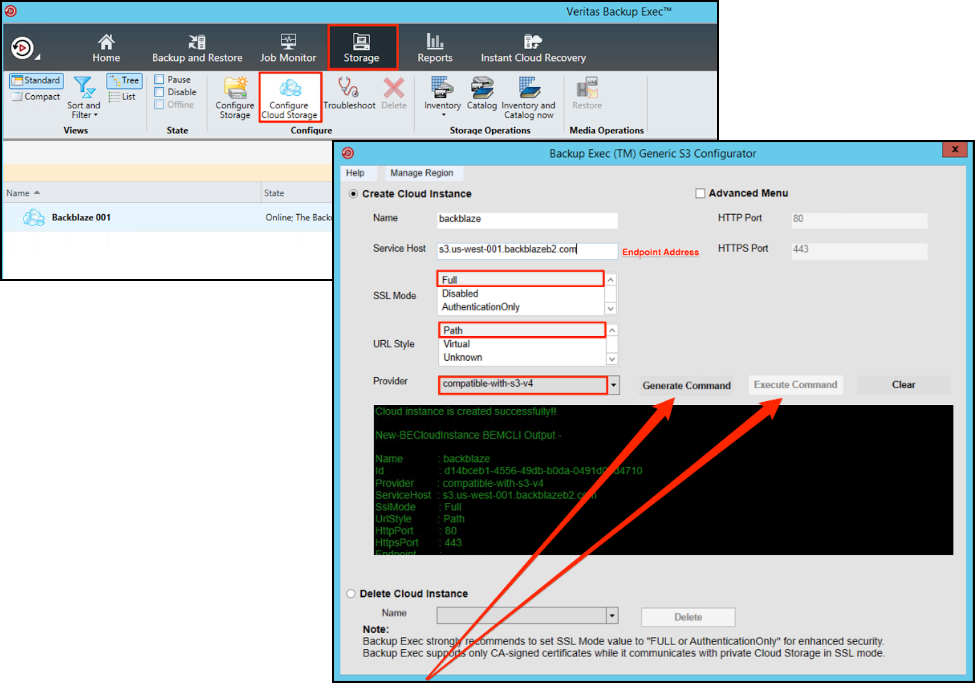
- Open the Veritas Backup Exec console.
- In the top ribbon menu, select Storage and select Configure Cloud Storage.
- Enter a name and a description for your cloud storage device.
- Optionally, select deduplication and encryption settings.
- Click Next.
- Select S3 as your cloud storage, and select To add a new S3 cloud instance using the Generic S3 Configurator tool, click here.
- In the configurator, select Create Cloud Instance.
- Enter the endpoint URL that you noted in the Create a Bucket task as the Service Host.
- Select Full as the SSL Mode.
- Select Path as the URL Style.
- Select compatible-with-s3-v4 as the Provider.
- Click Generate Command, and click Execute Command to create the S3-compatible provider that you will choose when you create a backup job.
Create a Region
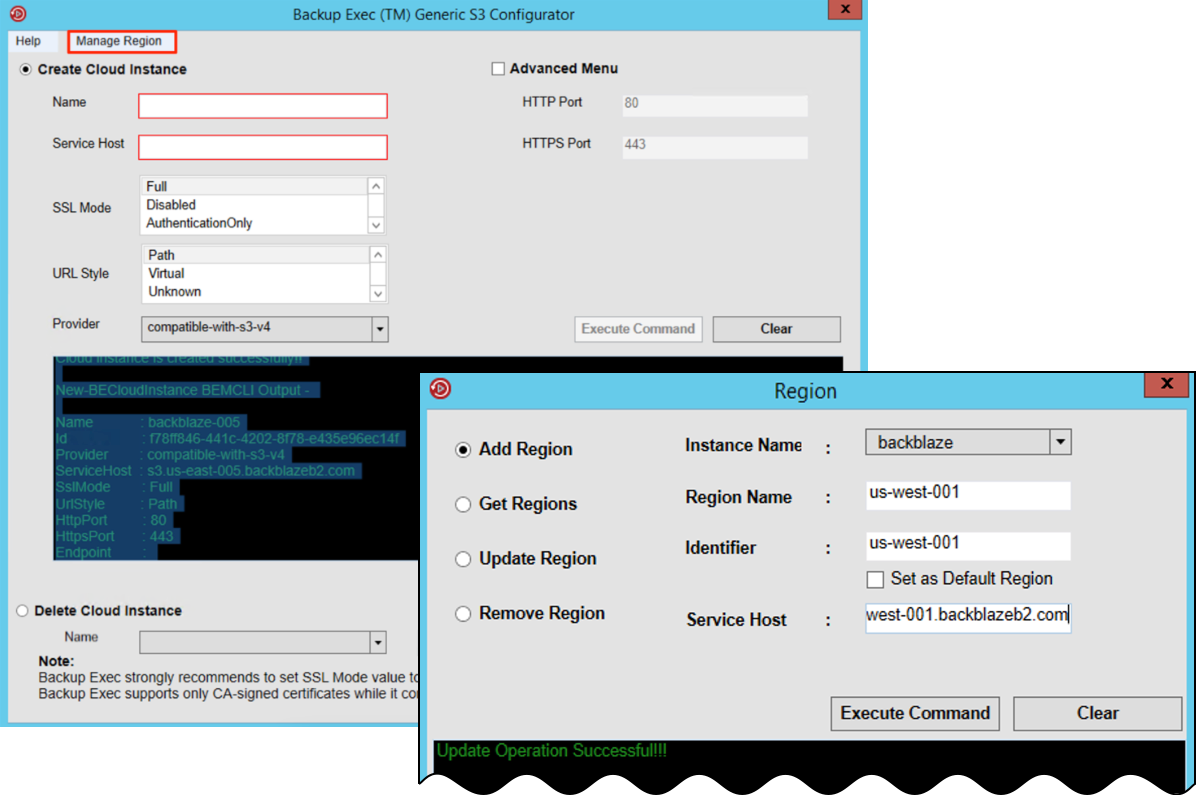
- In the Veritas Backup Exec S3 Configurator, select the Manage Region tab and select Add Region.
- Select the instance name that you created in a previous step.
- Enter your region, for example, us-west-001.
- Enter the identifier, for example, us-west-001.
You can find this value in the endpoint URL that you noted in the Create a Bucket task. - Enter the service point.
This value is the endpoint URL that you noted in the Create a Bucket task. - Click Execute Command.
Configure Cloud Storage using the Veritas Backup Exec Management Command-Line Interface
The Backup Exec Management Command-Line Interface (BEMCLI) is a set of PowerShell cmdlets that you can import on a Backup Exec machine to send PowerShell-based commands to the server.
Use the following commands to configure your cloud storage using the BEMCLI.
New-BECloudInstance -Name backblaze -Provider compatible-with-s3-v4 -ServiceHost s3.us-west-001.backblazeb2.com -HttpPort=80 -HttpsPort=443 -SslMode Full –UrlStyle PathNew-BECloudRegion -InstanceName backblaze -IsDefaultRegion $true -Name "us-west-001” -Identifier us-west-001 -ServiceHost s3.us-west-001.backblazeb2.com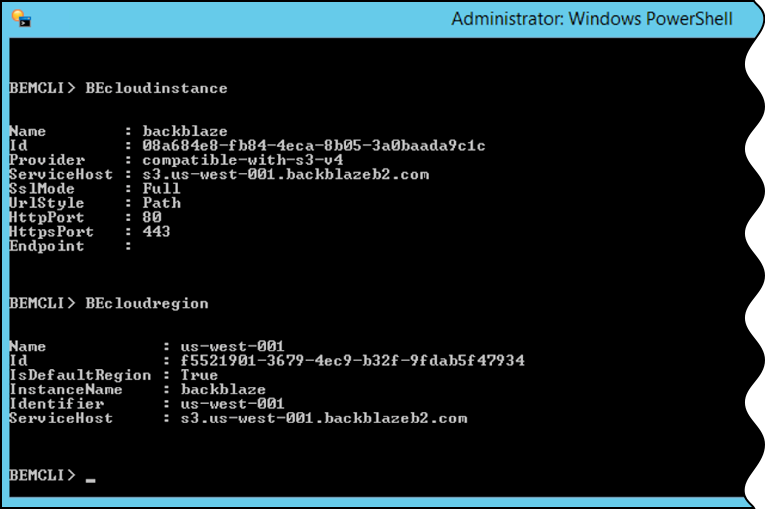
Connect Backblaze B2 to Veritas Backup Exec
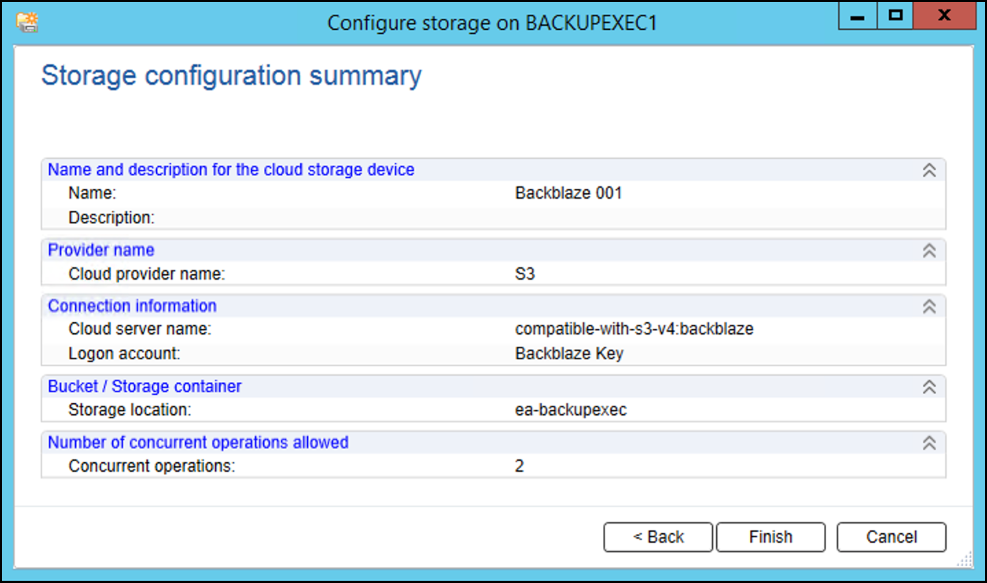
- In the cloud storage configuration wizard, select the cloud storage provider that you defined in a previous task, and click Next.
- Click Add/Edit to enter the credentials for your Backblaze account, and click Next.
- Click Add to enter a new login account.
- Enter your Backblaze application key ID as the user name, and enter and confirm your Backblaze application key as the password.
- Enter an account name for the key.
- Select This is a restricted logon account, and click OK.
Your Cloud Storage Provider and your Logon Account are both selected in the configuration wizard. - Click Next.
- Select the bucket that you created in a previous task as your backup target, and click Next.
- Increase the number of concurrent operations to improve performance, and click Next. You can adjust this setting later.
- On the storage configuration summary, click Finish.
Configure a Backup Job
Now that you have your Cloud Storage Target, you must create a new backup job to send data to it. This example provides steps to create a direct-to-cloud storage backup job. There is also an option to Backup to Disk and Duplicate to Cloud. You can choose either option depending on which use case works best for your environment.
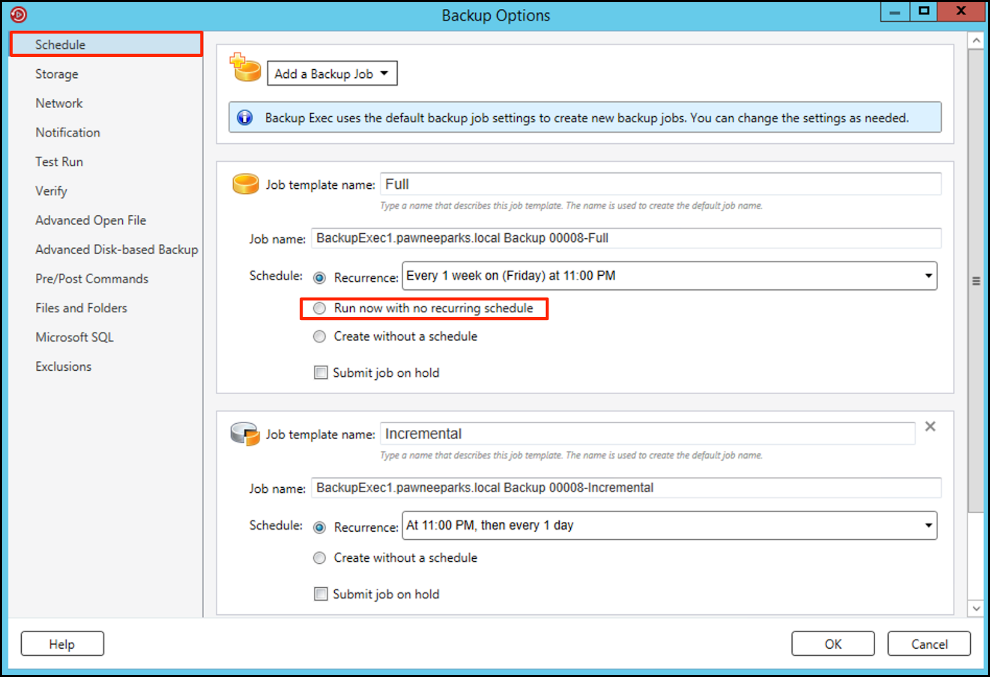
- Select Backup and Restore, select Backup, and select Back Up to Cloud.
- Select Edit to define the parameters of your backup job needs. By default, you have only one Cloud Storage Target so it is chosen as your default Cloud Storage Destination. You can change the default backup job.
- Click OK to run the backup job automatically based on the schedule that you choose.
- To run the job after you create this backup job, select Run now with no recurring schedule.
For more information about Veritas Backup Exec administration details, click here.
Was this article helpful?