S3 Browser Integration with Backblaze B2
- Print
- DarkLight
S3 Browser Integration with Backblaze B2
- Print
- DarkLight
Article summary
Did you find this summary helpful?
Thank you for your feedback
S3 Browser is a freeware Windows Client for S3-compatible cloud services such as Backblaze B2 Cloud Storage.
Enable Backblaze B2
Before you begin: You must have a Backblaze B2 Cloud Storage account. If you already have a Backblaze account and the left navigation menu contains a B2 Cloud Storage section, your account is already enabled for Backblaze B2.
- Sign in to the Backblaze web console.
- In the user menu in the upper-right corner of the page, select My Settings.
- Under Enabled Products, select the checkbox to enable B2 Cloud Storage.
- Review the Terms and Conditions, and click OK to accept them.
Create a Bucket
You can use an existing bucket, or you can create a new one. You will need the value from the Endpoint field for the S3 Browser configuration.
- Sign in to the Backblaze web console.
- In the left navigation menu under B2 Cloud Storage, click Buckets.
- Click Create a Bucket.
- Enter a name for your bucket. Bucket names must be at least six characters and globally unique.
A message is displayed if your bucket name is already in use. - Select a privacy setting: Private or Public.NoteYou can change a bucket's privacy settings at any time.
Files that are in a private bucket require authentication to perform an action, for example, downloading.
Public buckets do not require authentication so you can easily access files. If this is your first time creating a public bucket, complete the following tasks to ensure that you have the correct permissions to create a public bucket:
1. Verify your email address.
2. Have a payment history on file, or use the credit card form to pay a small fee that is credited to your account balance. - If applicable, enable a Backblaze B2 server-side encryption key.
- Enable Object Lock to restrict a file from being modified or deleted for a specified period of time.
- Click Create a Bucket, and copy the value that is in the Endpoint field; you may need this value later.
- Click Lifecycle Settings to control how long to keep the files in your new bucket.
Create an Application Key
If you use a bucket-restricted app key, select Allow List All Bucket Names to allow the List All Bucket Names permission to work successfully with the S3-Compatible API. If you do not select this option when you create your app key, you must create a new app key and enable the required permission.
Sign in to the Backblaze web console.
In the left navigation menu under B2 Cloud Storage, click Application Keys.
Click Add a New Application Key, and enter an app key name.
You cannot search an app key by this name; therefore, app key names are not required to be globally unique. Key names are limited to 100 characters and can contain letters, numbers, and "-", but not I18N characters, such as é, à, and ü.Select All or select a specific bucket in the Allow Access to Bucket(s) menu.
If you select a specific bucket, you can also select Allow List All Bucket Names.
This option is required for the B2 Native API b2_list_buckets and the S3-Compatible API S3 List Buckets operations.
(Optional) Select your access type (Read and Write, Read Only, or Write Only).
(Optional) Enter a file name prefix to restrict application key access only to files with that prefix.
Depending on what you selected in step #4, this limits application key access to files with the specified prefix for all buckets or just the selected bucket.(Optional) Enter a positive integer to limit the time, in seconds, before the application key expires.
The value must be less than 1000 days (in seconds).Click Create New Key, and note the resulting keyID and applicationKey values.
Note
When you create a new app key, the response contains the actual key string, for example N2Zug0evLcHDlh_L0Z0AJhiGGdY. You can always find the keyID on this page, but for security, the applicationKey appears only once. Make sure you copy and securely save this value elsewhere.
Configure S3 Browser with Backblaze B2
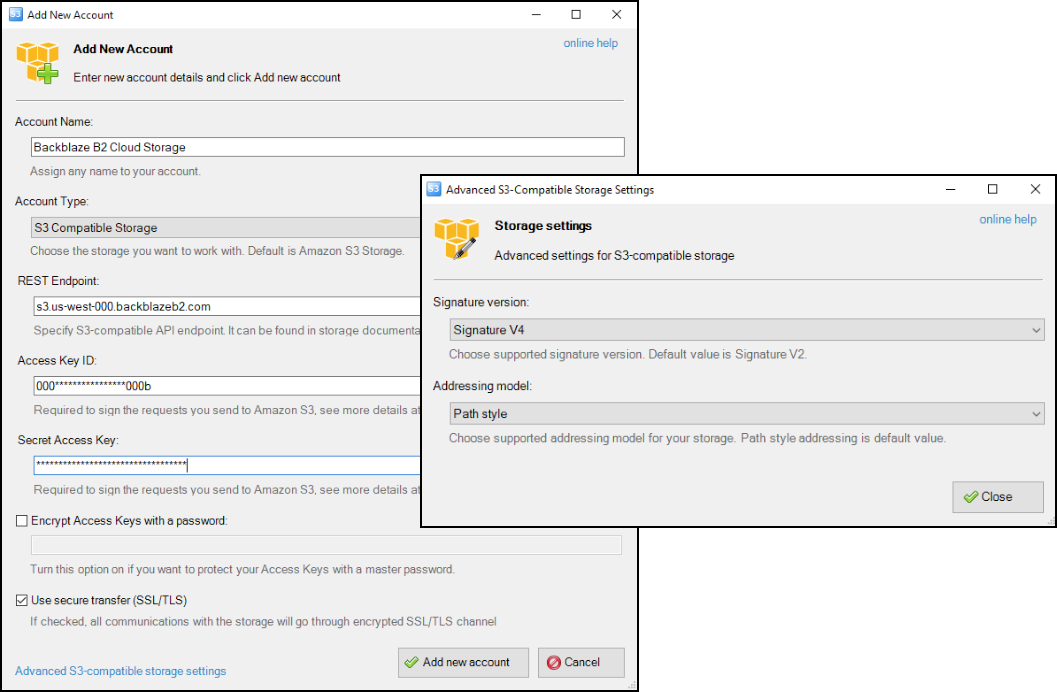
- Sign in to S3 Browser, and select the Add New Accounts tab.
- Enter your account details.
- Enter an account name, for example, Backblaze B2 Cloud Storage.
- Select S3 Compatible Storage as your account type.
- Enter the endpoint URL that you noted in the Create a Bucket task.
- Enter your application key ID in the Access Key ID field.
- Enter your application key in the Secret Access Key field.
- Click Add new account.
- Click Advanced S3-Compatible storage settings.
- Select Signature V4 in the Signature version field.
- Click Close.
Was this article helpful?