Thanks to recent updates of FreeNAS and TrueNAS, backing up data to Backblaze B2 Cloud Storage is now available for both platforms. FreeNAS/TrueNAS v11.1 adds a feature called Cloud Sync, which lets you sync, move, or copy data to and from Backblaze B2.
What Are FreeNAS and TrueNAS?
FreeNAS and TrueNAS are two faces of a comprehensive NAS storage environment built on the FreeBSD OS and OpenZFS file system. FreeNAS is the open-source and development platform, while TrueNAS is the supported and commercial product line offered by IXSystems.

FreeNAS is for the DIY crowd. If you don’t mind working with bleeding-edge software and figuring out how to make your software and hardware work harmoniously, then FreeNAS could be a good choice for you.

If you’re in a business or other environment with critical data, then a fully supported product like TrueNAS is likely the way you’ll want to go. IXsystems builds their TrueNAS commercial server appliances on the battle-tested, open-source framework that FreeNAS and OpenZFS provide.
The software developed by the FreeNAS open-source community forms the basis for both platforms, so we’ll talk specifically about FreeNAS in this post.
Working With FreeNAS
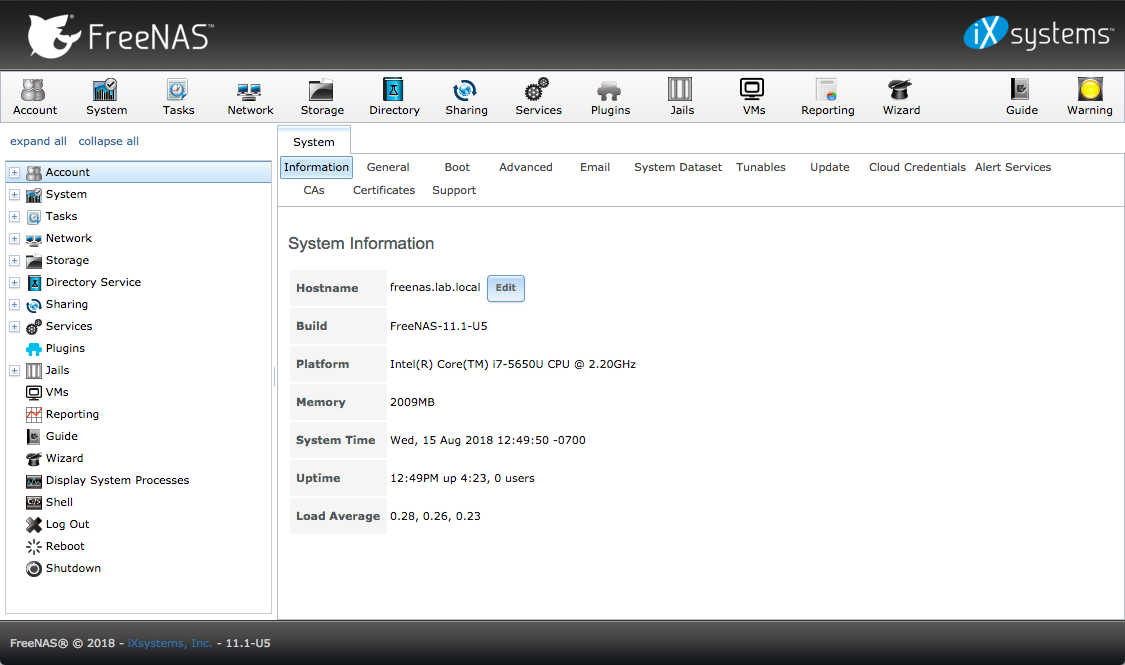
You can download FreeNAS directly from the open-source project website, freenas.org. Once installed, FreeNAS is managed through a comprehensive web interface that is supplemented by a minimal shell console that handles essential administrative functions. The web interface supports storage pool configuration, user management, sharing configuration, and system maintenance.
FreeNAS supports Windows, macOS, and Unix clients.
Syncing to Backblaze B2 With FreeNAS
Files or directories can be synchronized to remote cloud storage providers, including Backblaze B2, with the Cloud Sync feature.
Selecting Tasks ‣ Cloud Sync shows the screen below. This screen shows a single cloud sync called “backup-acctg” that “pushes” a file to cloud storage. The last run finished with a status of SUCCESS.
Existing cloud syncs can be run manually, edited, or deleted with the buttons that appear when a single cloud sync line is selected by clicking with the mouse.
Cloud credentials must be defined before a cloud sync is created. One set of credentials can be used for more than one cloud sync. For example, a single set of credentials for Backblaze B2 can be used for separate cloud syncs that push different sets of files or directories.
A cloud storage area must also exist. With Backblaze B2, these are called buckets and must be created before a sync task can be created.
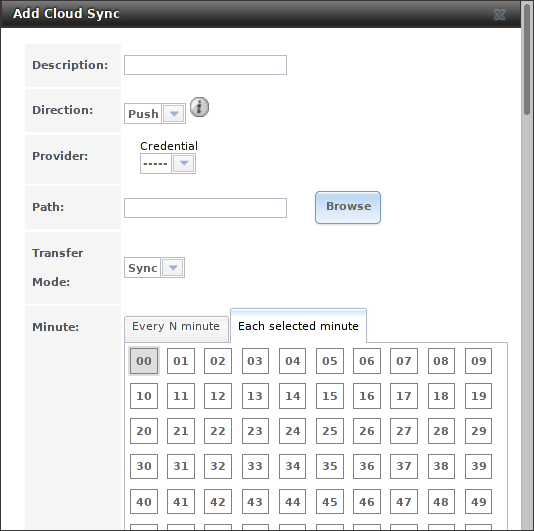
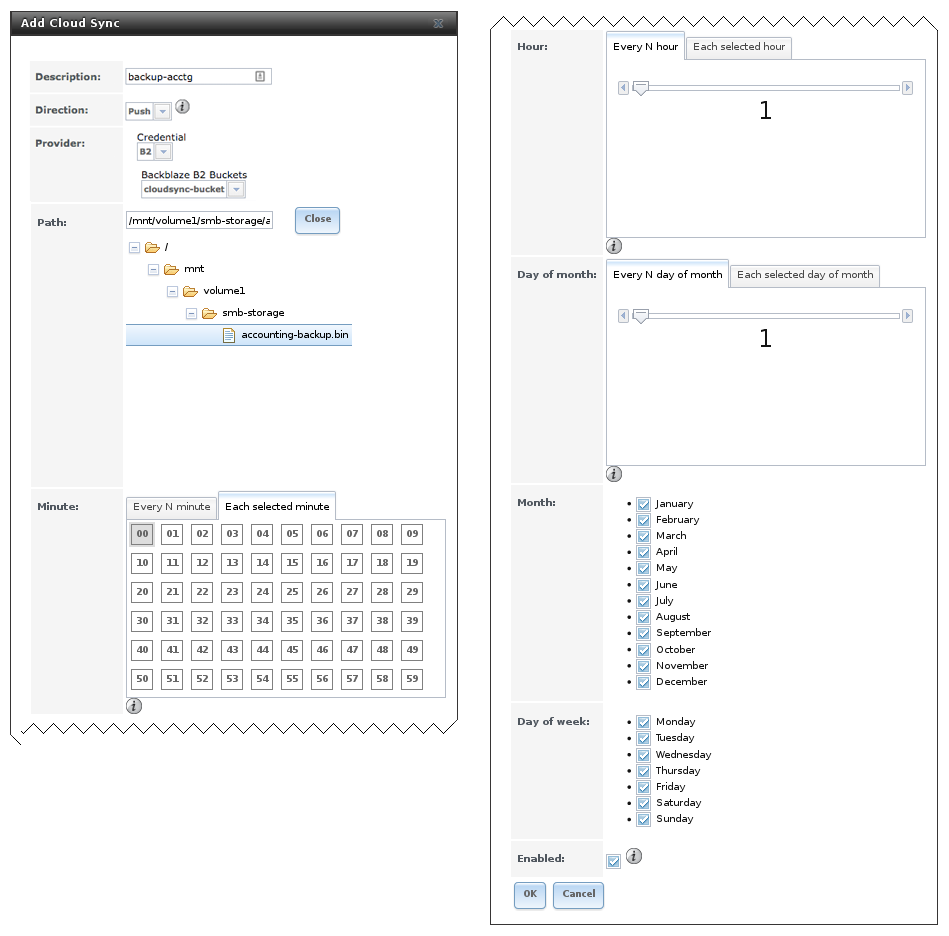
After the credentials and receiving bucket have been created, a cloud sync task is created with Tasks ‣ Cloud Sync ‣ Add Cloud Sync. The Add Cloud Sync dialog is shown below.
Cloud Sync Options
The table below shows the options for Cloud Sync.
| Setting | Value Type | Description |
| Description | string | a descriptive name for this Cloud Sync |
| Direction | string | Push to send data to cloud storage, or Pull to pull data from the cloud storage |
| Provider | drop-down menu |
select the cloud storage provider; the list of providers is defined by Cloud Credentials |
| Path | browse button |
select the directories or files to be sent for Push syncs or the destinations for Pull syncs |
| Transfer Mode | drop-down menu |
Sync (default): make files on destination system identical to those on the source; files removed from the source are removed from the destination (like rsync –delete) Copy: copy files from the source to the destination, skipping files that are identical (like rsync) Move: copy files from the source to the destination, deleting files from the source after the copy (like mv) |
| Minute | slider or minute selections |
select Every N minutes and use the slider to choose a value, or select Each selected minute and choose specific minutes |
| Hour | slider or hour selections |
select Every N hours and use the slider to choose a value, or select Each selected hour and choose specific hours |
| Day of month | slider or day of month selections |
select Every N days of month and use the slider to choose a value, or select Each selected day of month and choose specific days |
| Month | checkboxes | months when the Cloud Sync runs |
| Day of week | checkboxes | days of the week when the Cloud Sync runs |
| Enabled | checkbox | uncheck to temporarily disable this Cloud Sync |
Take care when choosing a direction. Most of the time, “push” will be used to send data to the cloud storage. “Pull” retrieves data from cloud storage, but be careful: Files retrieved from cloud storage will overwrite local files with the same names in the destination directory.
“Provider” is the name of the cloud storage provider. These providers are defined by entering credentials in Cloud Credentials.
After the provider is chosen, a list of available cloud storage areas from that provider is shown. With B2 Cloud Storage, this is a drop down with names of existing buckets.
“Path” is the path to the directories or files on the FreeNAS system. On push jobs, this is the source location for files sent to cloud storage. On pull jobs, the path is where the retrieved files are written. Again, be cautious about the destination of pull jobs to avoid overwriting existing files.
The minute, hour, days of month, months, and days of week fields permit creating a flexible schedule of when the cloud synchronization takes place.
Finally, the enabled field makes it possible to temporarily disable a cloud sync job without deleting it.
FreeNAS Cloud Sync Example
This example shows a push cloud sync which writes an accounting department backup file from the FreeNAS system to Backblaze B2 storage.
Before the new cloud sync was added, a bucket called “cloudsync-bucket” was created with the B2 Cloud Storage web console for storing data from the FreeNAS system.
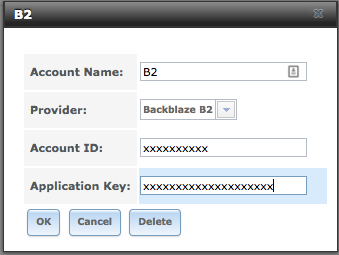
System ‣ Cloud Credentials ‣ Add Cloud Credential is used to enter the credentials for storage on a Backblaze B2 account. Enter an application key ID and application key for the Backblaze B2 account. This application key needs to have full read/write permissions for the bucket or section of the bucket that will be accessed. The credential is given the name “B2,” as shown in the image below:
Example: Adding Cloud Credentials
The local data to be sent to the cloud is a single file called accounting-backup.bin on the smb-storage data set. A cloud sync job is created with Tasks ‣ Cloud Sync ‣ Add Cloud Sync.
The description is set to “backup-acctg” to describe the job. This data is being sent to cloud storage, so this is a push. The provider comes from the cloud credentials defined in the previous step, and the destination bucket “cloudsync-bucket” has been chosen.
The path to the data file is selected.
The remaining fields are for setting a schedule. The default is to send the data to cloud storage once an hour, every day. The options provide great versatility in configuring when a cloud sync runs, anywhere from once a minute to once a year.
The “enabled” field is checked by default, so this cloud sync will run at the next scheduled time.
The completed dialog is shown below:
Dependable and Economical Disaster Recovery
In the event of an unexpected data loss incident, the VMs, files, or other data stored in Backblaze B2 from FreeNAS or TrueNAS are available for recovery. Having that data ready and available in B2 Cloud Storage provides a dependable, easy, and cost effective off-site disaster recovery solution.
Are you using FreeNAS or TrueNAS? What tips do you have? Let us know in the comments.


