Last month’s blog post about building our Backblaze Storage Pods generated a ton of interest and many people are building their own Pods! Our post also generated a ton of questions so, below we answer the common ones and provide more details about where to get components.
Detailed Backblaze Storage Pod Parts and Vendor List
| Item | Quantity | Price Per Unit | Total Price | Where to Buy |
|---|---|---|---|---|
| 1.5TB SATA Data Drive, Seagate ST31500341AS 1.5TB Barracuda 7200.11 SATA 3Gbps 3.5″ | 45 | $120.00 | $5,400.00 | *Here, or the slower low power version |
| 4U Enclosure (Download the 3-D model), Custom Designed 4U Red Backblaze Storage Pod Enclosure | 1 | $748.00 | $748.00 | **Protocase |
| 760 Watt Power Supply, Zippy PSM-5760 760 Watt Power Supply with Custom Wiring (qtys of 200+) | 2 | $270.00 | $540.00 | ***Zippy Technology Corp. |
| Port Muliplier Backplanes, Chyang Fun Industry (CFI Group) CFI-B53PM 5 Port Backplane (SiI3726) | 9 | $42.00 | $378.00 | ****CFI, or contact James at: (886-3)363-1521 Ext.215 |
| 3.3 GHz Intel Core 2 CPU, Intel E8600 Wolfdale 3.33 GHz LGA 775 65W Dual-Core Processor | 1 | $280.00 | $280.00 | Here |
| 2 Port PCIe SATA II Card, Syba SD-SA2PEX-2IR PCI Express SATA II Controller Card (SiI3132) | 3 | $35.00 | $105.00 | Here |
| 4 Port PCI SATA II Card, Addonics ADSA4R5 4-Port SATA II PCI Controller (SiI3124) | 1 | $70.00 | $70.00 | Addonics |
| Motherboard, Intel BOXDG43NB LGA 775 G43 ATX Motherboard | 1 | $85.00 | $85.00 | Here |
| Case Fan, Mechatronics G1238M12B1-FSR 120 x 38 mm 2,800 RPM 12V Fan | 6 | $13.60 | $82.00 | Beyond Components, or contact John Burke at: 800-971-4242 |
| 4GB DDR2 800 RAM, Kingston KVR800D2N6K2/4G 2x2GB 240-Pin SDRAM DDR2 800 (PC2 6400) | 1 | $50.00 | $50.00 | Here |
| 80 GB PATA Boot Drive, Western Digital Caviar WD800BB 80GB 7200 RPM IDE Ultra ATA100 3.5″ | 1 | $38.00 | $38.00 | ***** |
| On/Off Switch, FrozenCPU ele-302 Bulgin Vandal Momentary LED Power Switch 12″ 2-pin | 1 | $30.00 | $30.00 | Here, and be sure to pick the “2pin” cable option |
| SATA II Cable, SATA II Cable, 90 Degrees/straight with Locking Connectors | 9 | $2.00 | $18.00 | Here |
| Nylon Backplane Standoffs, Fastener SuperStore 1/4″ Round Nylon Standoffs Female/Female 4-40 x 3/4″ | 72 | $0.17 | $12.00 | Here |
| HD Anti-Vibration Sleeves, Aero Rubber Co. 3.0 x .500 inch EPDM (0.03″ Wall) | 45 | $0.23 | $10.00 | Here, and ask for Steve Ricker |
| Power Supply Vibration Dampener, Vantec VDK-PSU Power Supply Vibration Dampener | 2 | $4.50 | $9.00 | The Vantec part has been out of stock for a while, so you can use these, instead |
| Fan Mount (front), Acousti Ultra Soft Anti-Vibration Fan Mount AFM02 | 12 | $0.40 | $5.00 | Here, and note that this links to an 8-pack although you actually need 12 pieces |
| Fan Mount (middle), Acousti Ultra Soft Anti-Vibration Fan Mount AFM03 | 12 | $0.40 | $5.00 | Here |
| Nylon Screws, Small Parts MPN-0440-06P-C Nylon Pan Head Phillips Screw 4-40 x 3/8″ | 72 | $0.02 | $1.00 | Here |
| Foam Rubber Pad, House of Foam 16″ x 17″ x 1/8″ Foam Rubber Pad | 1 | $1.00 | $1.00 | † |
*Backblaze now uses the low power drives.
**Protocase is excellent at making custom cases in small quantities and in response to demand have dropped the price of the Backblaze Storage Pod enclosure to $700 each if you order 20 or more. Other case manufacturers can also build these cases from the 3-D model.
***Zippy Technology Corp. provides the power supplies. List price is about $500/unit. For quantities of 100+ (50 pairs), contact Mason Lee at the U.S. West Pacific branch of Zippy: +1-949-366-9525.
For smaller quantities, the Enermax Modu82+ 525W PSUs works well in the Backblaze Storage Pod and since those power supplies are modular it is easier to design the custom wiring harness. For $25 Enermax used to make the custom wiring harness but we have heard reports that they will no longer do this. If this is the case, since the power supply is modular, you could make your own custom wiring harness. The only catch is that you need a motherboard stub to turn the second PSU on/off. This is a $1 part but can be hard to find.
****CFI has now setup a complete, and very reasonable, pricing table for people who wish to purchase these port multiplier backplanes directly. Their pricing is:
200pcs US$40.00
150pcs US$41.00
100pcs US$42.00
50pcs US$43.00
40pcs US$43.50
30pcs US$44.00
20pcs US$44.50
10pcs US$45.00
5pcs US$45.50
1pc US$46.00
Note: If you are using latching SATA cables, make sure to ask for the port multipliers that support a latch-housing on the SATA connector.
*****The Western Digital drive listed has recently been discontinued. This is the closest match:
Western Digital Caviar SE WD800AAJB 80GB 7200 RPM 8MB Cache IDE Ultra ATA100 3.5″ Internal Hard Drive – OEM
However, most drives will work for the boot drive. We prefer PATA drives since this keeps the device name separate from the SATA data drives.
† House of Foam recently went out of business, but similar products can be ordered from other foam product suppliers.
Tips and Tricks for Building a Backblaze Storage Pod
Drives
Many people said, “Oh, I’ll build one of these Pods but switch the drives for 2TB drives or ones from XYZ vendor.” We tried drives from Western Digital, Hitachi, Samsung, and Seagate; 1TB, 1.5TB, and 2TB drives; and consumer and enterprise drives. Some of these drives performed terribly—dropping out of the RAID array on a regular basis. Other performed OK. The Seagate Barracuda 1.5TB low power drives have worked best for us. The 2TB Seagate drives have also worked well but currently cost more per GB than the 1.5TB drives; the Samsung low power drives have extremely high error rates; Hitachi and Samsung 7200 RPM drives performed well but we have done limited testing; and the Western Digital drives have not performed well in our setup. (Note: this is not necessarily to say these drives are good or bad, just how well they performed in this configuration.)
Heat
Tons of commenters worried about Backblaze Storage Pods BBQ’ing the drives. On the contrary, heat has not been an issue at all, six fans are definitely overkill and there are opportunities to reduce the number of fans. However, if you change the case design, type of drives, etc., make sure you monitor what impact your changes have made.
Power
We settled on our power supplies by figuring out the least expensive way to get high-efficiency power. If switching power supplies, ensure you have smooth power and there is plenty to spin up the drives from a cold start without being too close to the margin. In general, you need significant power on five volts (about 40-50 amps) which is what makes finding alternate power supplies a challenge.
Vibration
We worked hard to reduce vibration in the storage pods. Nylon screws, rubber fasteners for the fans, HD anti-vibration sleeves, foam insulation, etc., were all to dampen vibration. There is some data to show that our focus on vibration was important…though in discussions with the drive manufacturers, they claim that vibration is more likely to impact performance, not reliability. Having said that, if you change parts, make sure you are not increasing vibration.
Cables
While it’s tempting to lace up the cables tightly, they should actually be fairly loose so they do not pull on the connectors. And, even more important, ensure you are getting cables with good connectors. The actual cables rarely break, but connectors make a big difference: gold-plated, well-curved springy connectors that are shiny and not pitted if viewed under a microscope are ideal. (The ones we specified above are fine.) Also, ensure you get right angle SATA cable connectors, not left angle ones, so the cables route cleanly under the backplanes.
HD Anti-Vibration Sleeves
Vibration sleeves should be put on the drives at the level of the top grid such that they completely insulate it; the drives should not touch the grid. It takes a bit of practice at first, but quickly becomes easier than the standard process of putting four screws into a drive caddy.
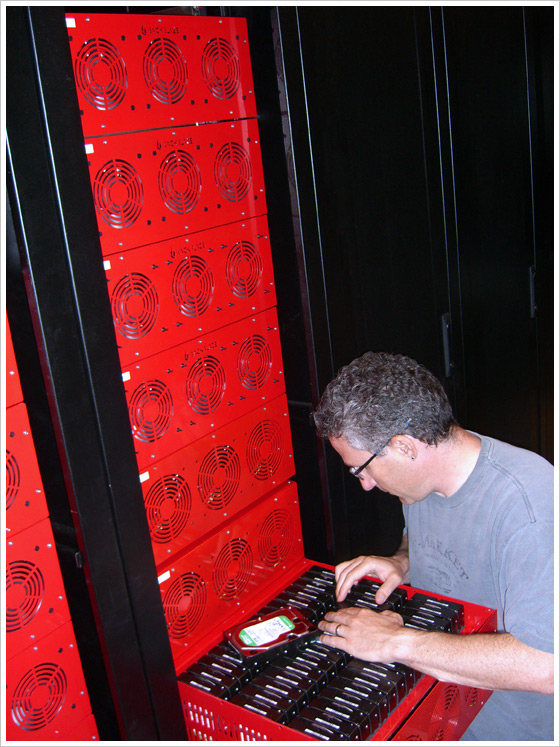
Cold Swap Drives
Technically the system will support hot-swapping drives. However, we never do this. Hot-swapping drives on any system increases the likelihood of something going wrong. Since these Pods are top-loaded and require moving the server to replace drives, it’s one more reason to power down before swapping drives. Here is a picture of me doing this:
Powering Up the Pod
We mentioned this in the original blog post, but it is worth repeating here: we recommend powering up PSU1 first, waiting until the drives are spun-up (and the power draw decreases to a reasonable level), and then powering up PSU2.
Test the Storage Pod
There are a number of tests that should minimally be run before deploying a Storage Pod into production. First, completely sync all the drives into a RAID array. This forces every sector on every drive to be read and some sectors to be written—a process that will take about three days for a Pod full of 1.5TB drives. Second, run a memory test on the system. And finally, run a load test on the Storage Pod. There are various tools out there to help with this process. (At Backblaze, we wrote our own to best simulate a real production environment.)
Hopefully this helps those of you who are working on building your own version of the Backblaze Storage Pod. We still intend to provide blog posts covering vibration, drives, and other areas of the Pod in detail. You should feel free to experiment; try different motherboards, CPUs, cases, fans, etc. Customize the Backblaze Storage Pod for your particular purpose. Do keep in mind that while it may seem that every component should work seamlessly with every other, it is not the case. If you are switching out pieces, expect to need to experiment to get the system working right.


